Sunday, December 1, 2013
HP Laserjet Error Codes
13.XX PAPER JAM [LOCATION]
Media is jammed at the specified location (and possibly at other locations). If the message persists after all jams have been cleared, a sensor or sensor lever might be stuck or broken.
Please cek
For all jam messages, do the following: 1. Remove jammed print media from the specified location. Check the entire paper path for other pieces of media in the path. 2. Open and close the top cover to clear the message. 3. Check sensors and flags in the paper path for proper operation.
3.0 PAPER JAM [LOCATION]
A non-specific paper jam occurred.
Cek 1. Remove jammed media from the specified location. 2. Verify the paper tray is fully closed. 3. Inspect and/or replace the feed and separation rollers. 4. Ensure there is no obstruction in the path, such as a torn piece of paper. 5. Open and close the top cover to clear the message. 6. Check sensors and flags for proper operation.
13.1 PAPER JAM OPEN INPUT TRAYS
Paper-delay jam at paperfeed area.
cek
1. Ensure that paper trays are loaded and adjusted properly so media can feed from the tray. It might be necessary to reduce the stack height of media in the tray. 2. Check the input area for obstructions such as media in the path. Also check to see if the registration assembly damaged or unseated. 3. Replace any defective sensors or flags. 4. Verify the media meets the specifications. 5. Check the pickup feed and separation rollers for unusual wear. Replace as needed. 6. Rotate the media in the input tray by 180° and/or turn it over
13.10 PAPER JAM CHECK DUPLEXER
Jam at duplexer.
cek 1. Check the duplexer and the rear area of the printer for obstructions or damage. 2. Check the duplexer for proper operation. Replace the duplexer if a sensor is defective.
13.14
For Laserjet 5si. This error is caused by a defective paper control PCA
cek Replace paper control PCA.
13.2 PAPER JAM OPEN INPUT TRAYS
Paper-stopped jam at paper-feed area.
1. Check the input area for obstructions such as paper in the path. Also check to see if the registration assembly is damaged or if the transfer roller is out of place. 2. Replace any defective sensors or flags. 3. Ensure the media does not exceed the maximum length. 4. If multiple sheets are feeding, it might be necessary to fan the media and reduce the stack height. Also, replace separation pad. 5. Verify that the fuser is properly installed.
13.20 PAPER JAM CHECK REAR DOOR
Media stopped in the paper path during power on or when the top door was closed.
1. Remove all media in the paper path, and then open and close the top cover. 2. If the message persists after all media is removed: Check if media is jammed in the prefeed area. Replace any defective sensors or flags
13.21 DOOR OPEN JAM
The top cover was open while printing.
1. Clear the jam and close the top door. 2. If the message persists, check the top door switch for proper operation.
13.5 PAPER JAM CHECK REAR DOOR
Paper-delay jam at fuser.
1. Check the transfer roller and small media belt to ensure they are operating and can feed print media. 2. Check the paper path for obstructions at the transfer roller, toner cartridge, paper feed assembly, and fuser. 3. Replace any defective sensors or flags. 4. Turn the media stack over and/ or rotate it by 180° in the input tray.
13.6 PAPER JAM CHECK REAR DOOR
Paper-stopped jam at fuser.
1. Check the paper path for obstructions at the fuser and output/delivery area. 3. Replace any defective sensors or flags.
13.99 PAPER JAM [LOCATION]
A non-specific paper jam occurred.
1. Remove jammed media from the specified location. 2. Verify the paper tray is fully closed. 3. Inspect and/or replace the feed and separation rollers. 4. Ensure there is no obstruction in the path, such as a torn piece of paper. 5. Open and close the top cover to clear the message. 6. Check sensors and flags for proper operation
Continue Reading[..]
Media is jammed at the specified location (and possibly at other locations). If the message persists after all jams have been cleared, a sensor or sensor lever might be stuck or broken.
Please cek
For all jam messages, do the following: 1. Remove jammed print media from the specified location. Check the entire paper path for other pieces of media in the path. 2. Open and close the top cover to clear the message. 3. Check sensors and flags in the paper path for proper operation.
3.0 PAPER JAM [LOCATION]
A non-specific paper jam occurred.
Cek 1. Remove jammed media from the specified location. 2. Verify the paper tray is fully closed. 3. Inspect and/or replace the feed and separation rollers. 4. Ensure there is no obstruction in the path, such as a torn piece of paper. 5. Open and close the top cover to clear the message. 6. Check sensors and flags for proper operation.
13.1 PAPER JAM OPEN INPUT TRAYS
Paper-delay jam at paperfeed area.
cek
1. Ensure that paper trays are loaded and adjusted properly so media can feed from the tray. It might be necessary to reduce the stack height of media in the tray. 2. Check the input area for obstructions such as media in the path. Also check to see if the registration assembly damaged or unseated. 3. Replace any defective sensors or flags. 4. Verify the media meets the specifications. 5. Check the pickup feed and separation rollers for unusual wear. Replace as needed. 6. Rotate the media in the input tray by 180° and/or turn it over
13.10 PAPER JAM CHECK DUPLEXER
Jam at duplexer.
cek 1. Check the duplexer and the rear area of the printer for obstructions or damage. 2. Check the duplexer for proper operation. Replace the duplexer if a sensor is defective.
13.14
For Laserjet 5si. This error is caused by a defective paper control PCA
cek Replace paper control PCA.
13.2 PAPER JAM OPEN INPUT TRAYS
Paper-stopped jam at paper-feed area.
1. Check the input area for obstructions such as paper in the path. Also check to see if the registration assembly is damaged or if the transfer roller is out of place. 2. Replace any defective sensors or flags. 3. Ensure the media does not exceed the maximum length. 4. If multiple sheets are feeding, it might be necessary to fan the media and reduce the stack height. Also, replace separation pad. 5. Verify that the fuser is properly installed.
13.20 PAPER JAM CHECK REAR DOOR
Media stopped in the paper path during power on or when the top door was closed.
1. Remove all media in the paper path, and then open and close the top cover. 2. If the message persists after all media is removed: Check if media is jammed in the prefeed area. Replace any defective sensors or flags
13.21 DOOR OPEN JAM
The top cover was open while printing.
1. Clear the jam and close the top door. 2. If the message persists, check the top door switch for proper operation.
13.5 PAPER JAM CHECK REAR DOOR
Paper-delay jam at fuser.
1. Check the transfer roller and small media belt to ensure they are operating and can feed print media. 2. Check the paper path for obstructions at the transfer roller, toner cartridge, paper feed assembly, and fuser. 3. Replace any defective sensors or flags. 4. Turn the media stack over and/ or rotate it by 180° in the input tray.
13.6 PAPER JAM CHECK REAR DOOR
Paper-stopped jam at fuser.
1. Check the paper path for obstructions at the fuser and output/delivery area. 3. Replace any defective sensors or flags.
13.99 PAPER JAM [LOCATION]
A non-specific paper jam occurred.
1. Remove jammed media from the specified location. 2. Verify the paper tray is fully closed. 3. Inspect and/or replace the feed and separation rollers. 4. Ensure there is no obstruction in the path, such as a torn piece of paper. 5. Open and close the top cover to clear the message. 6. Check sensors and flags for proper operation
Friday, November 29, 2013
How to reset the ink cartridge Canon CL 51 color
 If the cartridge refills CL-51 color when you put in the printer you put a sign saying that the cartridge is empty or is not correct cartridge.
Esto no es por que no tenga tinta (ojo que tambien puede estar vacio) es que la impresora pixma no tienen un sensor para saber la cantidad de tinta que tiene, lo que hace es reconocer el cartucho que se te termino y avisarte que esta vacio al contar determinada cantidad de impresiones. This is not because you do not have ink (note that also can be empty) is that the printer pixma not have a sensor to determine the amount of ink you have, what it does is recognize the cartridge that is over and warn you that this vacuum to have certain amount of impressions.
Para solucionar esto lo que hay que hacer es: To fix this you have to do is:
Cuando intentes imprimir y te sale el cartel de que no tiene tinta apreta durante 20 segundo el boton (depende el modelo de impresora cual boton, pude ser el de las hojas o uno que tiene dibujado un triangulo al reves) When you try to print and sign out the ink has not click the button for 20 seconds (depending on the printer model that button, I could be the leaves or one that has drawn a triangle upside down)
Cuando lo sueltes se borrara el nivel de tinta y podras imprimir tranquilamente. Be erased when you release the ink and you can print smoothly. Lo que de ahora en adelante no te va a decir nunca mas que cantidad de tinta tiene. What henceforth not going to say anymore that has ink. PERO PUEDES IMPRIMIR ! BUT YOU CAN PRINT!
Aca te damos un listado de impresoras canon que utiliza el cartucho color CL51 Here we give a list of Canon printers that uses the color cartridge CL51
PIXMA iP1800 PIXMA iP1800
PIXMA iP2500 PIXMA iP2500
PIXMA iP2600 PIXMA iP2600
PIXMA MP140 PIXMA MP140
PIXMA MP210 PIXMA MP210
PIXMA MP220 PIXMA MP220
PIXMA MP470 PIXMA MP470
PIXMA MX300 PIXMA MX300
PIXMA MX310 PIXMA MX310
Wednesday, November 27, 2013
Reset the maintenance count on an HP Laserjet 8000 8100 and 8150
The Care Exercise indicates you poorness go into the Configuration Schedule and set the Run Substance touch to OFF to perspicuous the Fulfil Machine Mending message. We make open that this does not always utilize (probably due to polar formatter revisions). We suggest the followers work to manually set the mend separate to cypher.
After installing a mending kit, correct the reparation tally to cardinal by:
1. Preserve coupling way as described on our arrival assist fashion tender.
2. Go to the MAINTCOUNT impede and counsel + or - to roll the ascertain to cypher (all zeros).
3. Mold the Superior secure to begin the settings into the printers store (an asterisk faculty seem close to the zeros).
4. Move function style by imperative the GO add.
Tone: Do not occurrence the Repair Distance regard, which is other deciding in force modality. This evaluate is the measure at which a repair kit should be installed (350,000 pages on Laserjet 8000, 8100, or 8150 programme).
Set the upkeep weigh an HP Laserjet 5si
After you lay the mending kit, you can vindicated the Fulfill Mortal Mending message by achievement to the printers command window Constellation Listing and environment the Mating Communication = to OFF. Annotation: this message present only appear in the Constellation Agenda if the Action USER Fix message appears.
Continue Reading[..]
After installing a mending kit, correct the reparation tally to cardinal by:
1. Preserve coupling way as described on our arrival assist fashion tender.
2. Go to the MAINTCOUNT impede and counsel + or - to roll the ascertain to cypher (all zeros).
3. Mold the Superior secure to begin the settings into the printers store (an asterisk faculty seem close to the zeros).
4. Move function style by imperative the GO add.
Tone: Do not occurrence the Repair Distance regard, which is other deciding in force modality. This evaluate is the measure at which a repair kit should be installed (350,000 pages on Laserjet 8000, 8100, or 8150 programme).
Set the upkeep weigh an HP Laserjet 5si
After you lay the mending kit, you can vindicated the Fulfill Mortal Mending message by achievement to the printers command window Constellation Listing and environment the Mating Communication = to OFF. Annotation: this message present only appear in the Constellation Agenda if the Action USER Fix message appears.
Monday, November 25, 2013
How to Reset Ink Level Canon MX300 Cartridges
The Canon PIXMA MX300 is All-in-One Inkjet Printer designed for office uses. This canon printer combine scan, fax, copy, and print into one easy machine. Canon MX300 can scan vivid images with color resolutions up to 4800 x 1200 dpi. This all in one printer compatible with Windows Vista, Windows XP, Windows 2000, and Mac OS X 10.2.8 to 10.4.x8 operating systems and printer using PG-40 black cartridge and CL-41 color cartridge.
I have not found the software resetter for Canon Pixma MX300 in internet but don’t worry if you have problem with this multifuction canon printer, you can reset it manually. This reset method is to reset ink level in Canon MX300 if your printer stop to print after refilling the cartridges. Update: severals readers say, this reset methods also work on Canon MX308.

Here the Solution to reset the ink level for Canon Pixma MX300 follow this steps to reset the ink level in your canon MX300.
I have not found the software resetter for Canon Pixma MX300 in internet but don’t worry if you have problem with this multifuction canon printer, you can reset it manually. This reset method is to reset ink level in Canon MX300 if your printer stop to print after refilling the cartridges. Update: severals readers say, this reset methods also work on Canon MX308.
Here the Solution to reset the ink level for Canon Pixma MX300 follow this steps to reset the ink level in your canon MX300.
- Switch off the Canon MX300 and disconnect the power cable.
- While press and hold the power button, Connect the power cable to electric socket.
- While pressing the power button, press the “Cancel/Stop” button (red button).
- Now release the power button and the printer turns into a kind of factory mode. Wait for 10 seconds until it says “idle”.
- Press “>” (next button) once “Shipping Mode 3″ then Press the “OK” button. Press “OK” again for “without cleaning”.
- A test page will print.
- Open the cover, like you are about to change the cartridges.
- Disconnect the power cable again without switch off the printer.
- Take out the both cartridges.
- Close the cover.
- Connect the power cable and turn on the printer.
- Now just put the cartridges back and the ink level in the canon Pixma MX300 have full again.
Saturday, November 23, 2013
Printer Epson Stylus Office T40W Short Review
On November 2008 ago Epson released new inkjet printer models printer named Epson Stylus Office T40W. This Printer is ideal for the Small Office and Home Office (SOHO) and Small and medium enterprise (SME). Print speed of the Epson Stylus Office T40W in draft mode is 38 page per minutes (38 PPM) and for quality text is 27 Page per minutes (27 PPM). Epson Stylus Office T40W have wireless connetions features so that facilitate user to print using computer or laptop without cable connections.

Epson Stylus Office T40W claimed to have usage of energy thrice smaller compared other laser printer and Epson Stylus Office T40W give the more choices to print to various media. Epson Stylus Office T40W can print various media like photo paper glossy and matte paper and so in plain paper.
Features of Epson Stylus Office T40W:
- This printer using water resist Epson DURABrite Ultra ink
- Network-Ready (can be connected to computer network)
- Intelligent Ink Cartridge System for best printing result
- Speedy printing compared that previous version of Epson inkjet printer
- Epson Micro Piezo Print Head
- Variable Sized Droplet Technology
- Photo Printing Excellence
Thursday, November 21, 2013
How to reset the protection counter of Epson T60 and T50 Resetter

FIX PRINTER ERROR "parts inside printer end service life, waste ink pad counter overflow error"
Please follow this steps to reset the protection counter effectively.
Epson T50 and T60 Resetter
Click adjprog.exe.
Click “Accept” button.

Click “Particular adjustment mode” button.
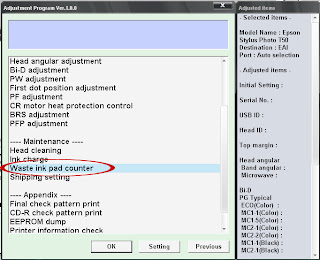
Select on “Waste ink pad counter” and click “OK” button.
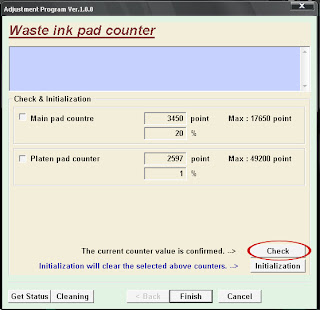
Click on Check to confirmed the current counter value(my printer shows only 20%)

Put a check on "Main pad counter" and "Platen pad counter" then Click on “Initialization” button
and the program will reset the protection counter.

Turn off the printer as a program instructed then turn on again.

Click the "Check" button again to check the waste ink pad value.
Click “Finish” button. and its done!
Click “Finish” button. and its done!
Warning: You might end up with ink leaking out of the printer if you dont either replace the waste ink pad or install external waste bin.
Tuesday, November 19, 2013
How to Reset Printer Canon iP 4200
 With the Printer power turned off, while pressing the Resume/Cancel button, press and hold the Power button. (DO NOT release the buttons. The Power LED lights in green to indicate that a function is selectable.)While holding the Power button, release theresume/Cancel button. (DO NOT release the Power
button.)
While holding the Power button, press the Resume/Cancel button 2 times, and then release both
the Power and Resume/Cancel buttons. (Each time the Resume/Cancel button is pressed, the Alarm and Power LEDs light alternately, Alarm in orange and Power in green, starting with Alarm LED.)
When the Power LED lights in green, press the Resume/Cancel button the specified number of
time(s) setting).
Time(s) LED indication Function Remarks 0 times Green (Power) Power off When the print head is not installed, the carriage returns and locks in the home position capped.
- Time Orange (Alarm) Service test print .
- Times Green (Power) EEPRsaya information print
- Times Orange (Alarm) EEPRsaya initialization
- Times Green (Power) Waste ink counter resetting
- Times Orange (Alarm) Destination settings After entering the destination settings mode, press the Resume/Cancel button the specified number of time(s) to select the destination. For detail, see "Destination settings procedures" below.
- Times Green (Power) Print head deep cleaning (Cleaning of both black and color)
- Times Orange (Alarm) Reserved
- Times Green (Power) CD / DVD check pattern
- Times Orange (Alarm) CD / DVD print position correction (horizontal: X direction)
- Times Green (Power) CD / DVD print position correction (vertical: Y direction)
to the menu selection
14. Times Green (Power) Left margin correction Not used in
servicing.
15. Times Orange (Alarm) Return to the menu selection
Time(s) LED indication Destination CD / DVD print
0 times Green (Power) No change of the destination
1 time Orange (Alarm) Japan Supported
2 times Green (Power) Korea Not supported
3 times Orange (Alarm) US Not supported
4 times Green (Power) Europe Supported
5 times Orange (Alarm) Australia Supported
Subscribe to:
Posts (Atom)